Open Spaces – The Wandering Mind EP

One of my ambient music aliases, Open Spaces, has released a new EP of works titled The Wandering Mind. The EP is released by the Australian imprint, lo fi spiritual, and can be found on all digital platforms.

This alias focuses on creating ambient spaces and moods that engage the listener in a two way relationship rather than the usual one way consumption of pop music. This ambient release aims to have an ambiguous edge to the music, in other words to create a sonic environment where the listener is unsure of what is part of the music and what is sounds from the outside environment. A metaphor if you will, for the wandering mind, that is shaped and influenced by both the internal and external environment.

The moods of this record therefore rely on a combination of field recordings, synthesis and 360 mixing to create immersive sonic environments.

For those interested in such concepts of ambient music, here’s a great introductory video of one of the ambient music forefathers, Brian Eno, talking about such concepts.


Sound West – Immersive Sound conference presentation

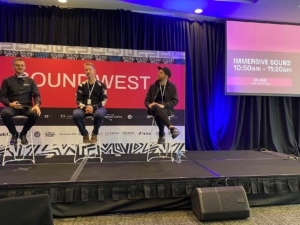
In August I was invited to speak on Immersive Sound at the Sound West conference at the CommBank Stadium at Parramatta.

Chaired by Radovan Klusacek (SAE Sydney Campus Manager) and joined by Stewart Gedes (301 Studios), we covered many aspects of the emerging field of 360 audio.

The session gave a history of immersive 360 audio, from university based researched through to the easily available plugins and DAW enabled 360 tools available to the modern producer.

The Q&A at the end of the panel was interesting in that it definitely appear that we had engaged some of the young producers in the room to experiment with some of these new production tools and capabilities.

If you are a producer and are interested in the creating 360 music and audio, here are a few links to get you started.

Ableton Live user try the open source freeware – Envelop For Live

All DAW users try the free dearVR micro plugin

ProTools users try the FB360 suite

Logic Users – enjoy the fact that as of Logic Pro 10.7 (2021) dolby atmos spatial mixing is now native to Logic. Here’s a quick youtube tutorial to get you started.


Electric Korma recording session

On the 14th of July I had the pleasure of tracking a rather curious band by the title of Electric Korma at Stranded Recording Studios.

Effectively they are a red hot trio that do abstracted, rocked-out Hindi Hits / Bollywood covers. A bizarre niche, as admittedly by the front man George, but profitable, and popular amongst the affluent Australian Indian community.

The emphasis of the session was to get great drum takes, and possibly some keeper bass takes and guitar takes. But band leader George and Bass player Joey, stated at the onset that they might do overdubs after the fact at their home studios. The Input list below confirms such, the emphasis being on the drums with minimal mic’ing of other elements.

ELECTRIC KORMA – 14/7/22 INPUT LIST

  1. Kick In – AKG D112
  2. Kick Out – AKG D25
  3. Snare up – Shure SM57
  4. Snare Down – Shure SM57
  5. Hat – Rode TF5
  6. Rack –
  7. Floor – Sennheiser MD – 421
  8. OH L – Coles 4038
  9. OH R – Coles 4038
  10. Room – Gefel – Um-70
  11. Bass DI
  12. Bass Amp – M88
  13. GTR Amp – Shure SM57 – LP 3
  14. Scratch Vox 1 – Shure SM58 – LP 4
  15. Scratch Vox 2 – Shure SM58 – LP 5
  16. Scratch Vox 3 – Shure SM58 – LP 6

The band wanted to play live, and this has informed and directed the mic choice to focus on dynamic and ribbon microphones to minimise bleed between instruments.

The mic choices are fairly standard, but a few things excelled or impressed me during the session.

Firstly, I’m loving the Beyerdynamic M160 double ribbon mic on toms. They have that ribbon warmth and have great rejection past 110 degrees (according to the manufacturers) which keeps down too much cymbals or other drums getting into the mic.

Secondly, The Coles 4038 ribbon mics are such a warm lovely choice for rock drum overheads, and in this particular application, really minimise bleed from bass and guitar amps compared to condenser mic options. They also respond so nicely to a bit of a high shelf lifting those higher frequencies that aren’t so pronounced in ribbons generally.

Lastly, a bit of an AKG overkill, but the D112 and D25 made for a solid, warm thumping kick drum sound.

Below are a few pics from the session.


Solfeggio Sculpture in 360 audio

During 2021 I wound back most of my freelance work in order to finish my masters. For my final masters project I focused on creative research into the emerging technology of 360 audio spatialisation. In particular 360 spatialisation that can be encoded to binaural format for headphone listening.

I reviewed the literature on human spatial perception and looked at what is and isn’t possible within the 360 compositional space.  

This creative experimentation within the 360 space explored concepts brought forward from the literature review, and resulted in 4 EPs of spatialise compositions for headphone listening. Some of the compositions have become quite minimal in order to leave space for perception of the 360 space, in particular 360 parameters such as azimuth, elevation and radius. Further, the academic atmosphere of the research has put me in the mood to return to my on going interest in the esoteric side of audio, ie binaural beats, solfeggio frequencies and the like.

The first of these works has recently been released through lo fi spiritual and can be heard below. The title of this first release is Solfeggio Sculptures and is released under my own name rather than any of my previous aliases.

Drums with Nick Cassey

Recently, I had the pleasure of getting Nick Cassey down for a late night drum session for a record by Michelle McCosker. The musical vibe we were after was warm, laid back, country and reflective pop with an openness to a contemporary tone.

The session input list was, as below, using the pre amps in the Neve Custom 75 in Retro Mode:

  1. Kick In – Audix D6 – JLM FC500A Fet Compressor
  2. Kick Out – Electro Voice RE20 – Distressor
  3. Snare Up – SM57 – Distressor
  4. Snare Down – SM57
  5. Hat – AKG 451
  6. Rack Tom – Sennheiser MD421
  7. Floor Tom – Sennheiser MD421
  8. Overhead L – AKG414 B-ULS – AMS Neve 33609 Limiter / Compressor
  9. Overhead R – AKG414 B-ULS – AMS Neve 33609 Limiter / Compressor
  10. Crotch mic – Sennheiser 441  – JLM FC500A Fet Compressor
  11. Blumlein room Mid – Nuemann U87 – JLM LA 500A Opto Compressor
  12. Blumlein room Sides – Nuemann U87 – JLM LA 500A Opto Compressor

Wins from the session included:

Nick Cassey’s performance and his array of home made brushes made from various natural grasses from his adventures through the Australian landscape.

The D6 and RE20 combination of mics and processing on the kick. We had a scooped sub and tap from the D6, which was complemented and filled in nicely with the warmth from the RE20 on outside kick duties.

Further, I really enjoyed the warmth and tone of the pre amps in this console in general.

Other wins include the darkness and warmth of the old AKG414 B-ULS compared to the newer ones. That tone worked well on the overall drum sound.

Lastly, both the JLM 500 series compressors were enjoyable to work with, and I look forwards to understanding their tone better across future sessions.

A big thank you for Nick’s time and drum work on this record.

Below are a few pictures from the session.


Neve Custom 75 w Brani Gerun

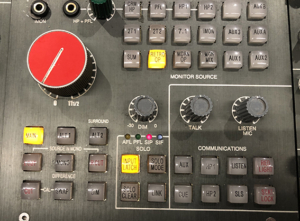
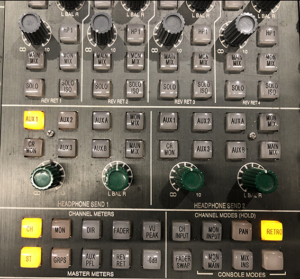
It’s in between trimester break, and as well as finishing some mixes for clients and a variety of my aliases, I have decided to finally take Senior Lecturer Brani Gerun up on the generous offer to have a quick crash course / masterclass on the Neve Custom 75 at SAE Sydney.

Below are a bunch of notes for myself, and any who may benefit:

  1. As with any console, especially one that gets used by a lot of students, it is good to know how to recall the initial setting – To do so hit RCL, then O and then RCL (recall) again in the centre of the console. The console will now be in record mode


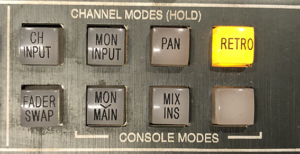
2. The main input path has 4 option, selectable by the input button – Mic, DI (no 48v automatically activated), DAW & line. Note the input paths can be changed globally for the desk by using the Channel Modes in the centre of console and holding down the CH INPUT button till all channels switch to the next input option. Also note that each channel strip has the usual Neve 6dB steps, a trim pot, phase flip, +48V and a HPF.

 

3. Auxes and headphone mixes – Aux 1 at the bottom, 5 Auxes, with Aux A & B being stereo. Note the gain pot when pressed will switch the Aux send from pre fader to post fader, for both channel path (default) and Monitor paths. Note Aux A & B share a gain pot, but can be isolated via the master Aux section in centre of the console. You can listen to the any of the Aux via choosing the Aux from the Monitor Source (note usually on Retro OP default). After dialling in the level you desire from each channel, turning up master Aux, potentially soloing / auditioning that Aux, the you need to allocate that Aux to the relevant Headphone channel in the Headphone section of the console. Note the green volume control increases will be effective for the listener on headphones but won’t be heard on the console. 12 o’clock is a good starting point. Re communicating to a performer on that headphone send you can hold down the relevant headphone channel or Aux in the communications part of the console, again 12 o’clock is a good starting position.

4. Neve EQ section, mirrors the 1081 EQ, note the EQ section, even individual parameters within the EQ, are only in the path when engaged. Also the EQ in only in the channel path not the monitor path (below the EQ section), so one must change the console input mode to DAW to use the EQ in a mix senario. Note the EQ section also contains the INSERT button and the INSERT is after the EQ. The patch bay is half normaled so the signal will go to the DAW regardless. Note the insert button can be used as a bypass button when judging an outboard compressor setting or equivalent patching decision.

5. Second Audio Path, generally used as the monitoring path:

Solo, Cut, Level and Pan, you can choose select and change it in the centre of the console, DAW return is the default with no line light on. Note in default mode the big fader is input to DAW level the pot is the return from the DAW
6. Solo Section:

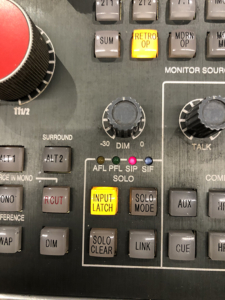
You have AFL (after fader listen), PFL (pre fader listen), SIP (keeps the signal where it is panned), SIF (solo in front) dims the rest of the mix.
7. Speaker selection:

8. Faders and possible FEEDBACK! Each channel goes to the master bus and direct out, so if both faders up can cause feedback. You can select one channel at a time and take it out of main mix, but for now, Brani recommends we just use the Mon fader for most options. So leave all channels on main, and just use the monitor main red fader, and have the Monitor Source section of the console set to Mon Mix (see below).

`

In default mode, the long faders feed tape / Pro Tools, but note the fader and pot relationship can be flipped globally in the Console Modes centre section via the Fader Flip button (see below). In that state, the bottom pots are feeding the recording medium and the fader is the return from that medium. NB in the Console Modes control section we can engage Fader Swap by holding it in, so that the small pots feed Pro Tools and the big faders return from the Pro Tools session. NB the HPF per channel also engage per channel the Fader Swap mode.

9. 2254 compressor / limiter: Note the Right VU meter is not working. The unit is available on the patch bay. Using the metering button you can meter the input, GR or output. Note left is on the bottom, it will take the compressor threshold from the side, left or right that has the lowest threshold. Also NB that the compressor make up gain is prior to the Limiter, so you can drive into the limiter if required.

10. Rev / Returns. The console has 4 reverb returns which are available on the patch bay, so the operator can for example set up a reverb on an Aux and then feed it back via the REV/RETs and then can choose via buttons whether that gets routed to Mon Mix, Main Mix or HP 1 or HP 2, there is a gain pot as well per channel to determine the level.
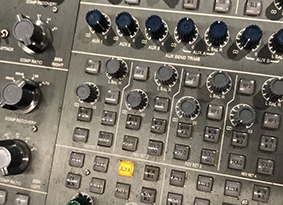
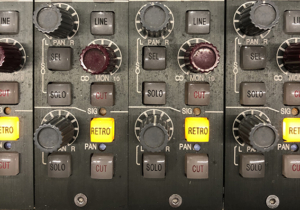
11. Traditional Neve design sums voltage, SSL sums current (voltage remains same), voltage summing uses transformers, current summing uses Op Amps, hence the more coloured sound of Voltage summing. On the patch bay the Retro Mix sums via transformers (Iron based), whereas the Modern Mix sums via op amps. To send to either summing path you can select per channel via the Retro button, note if not engaged it goes to the op amp / modern path. Note these can be change globally in the centre console modes.
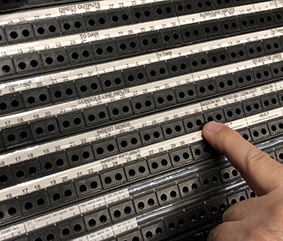
To sum mixes chose your summing mode and patch from that and into “To DAW” channel desired, and then out of the “From DAW” channels.

And then patch to 2 Track Mon In, that way you can monitor post Pro Tools and really understand what is being recorded. NB don’t pull faders up of the channels as that will create a feedback loop.

…….

There is a long way to go but with this console, but I’m very grateful to Brani for helping start me on my journey with this console.


In The Making Podcast by Make Shift

Recently I’ve been doing the audio post production on a new podcast by Make Shift called In The Making.

I’m really enjoying the content; it’s all about the arts and the use of creative practices for best mental health. Within each episode, the host, Jennifer Macey interviews artist from various disciplines about their creative practice and the role of creativity in their mental health.

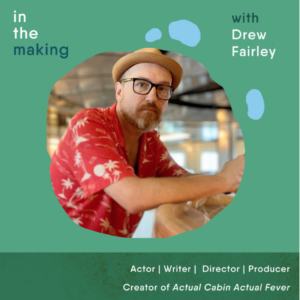
The first two episodes are currently available from all the usual outlets and feature the fabulous Australia creators, Kirli Saunders and Drew Fairley. Click on the images below to access the podcasts from Spotify. Alternatively here’s Make Shift‘s page on Spotify.


From an audio production perspective, it has been enjoyable to ponder best practice for podcasts, and as a result below is a reflection on my current signal chain.

For the main interviewee and interviewer audio, the processing and order of processing that has been working thus far is:

1. UAD SSL G Bus Compressor with a quick attack time and a gentle ratio to control the dynamics

2. Waves DeEsser to tame any sibilance

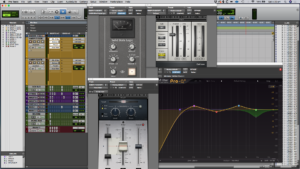
3. Fab Filter Pro-Q3 to add some warm in the low mids, some articulation in the mids and some further control of the sibilance/ high frequencies around 8-10kHz via dynamic EQ, see the EQ curve pictured above.

4. Waves Vocal Rider to level the differences in levels through the recording

Beyond that chain of plugins, a further bit of volume automation has helped control perceived levels that the AI of Vocal Rider hasn’t addressed. Secondly, some Izotope RX 7 De-Clip has also been used to remove any clipping that occurred mid interview.

All the vocal content/ channels have then been bused to a Vox Bus channel where a touch more compression and EQ has been applied to polish the sound.

Beyond vocal content, the podcasts have all made use of some atmospheric sounds and music. These channels of content have been routed to a Music Bus where some side-chain compression has been applied so that the Vocal Bus will compress or duck the musical content to ensure that the vocals are always the focus or dominant sound.

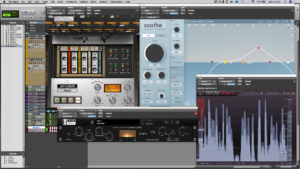
Both the Vox Bus and the Music Bus then route to the master bus. The processing on this final bus is pictured below.

The master bus chain is currently:

  1. UAD Studer 800 – applying some gentle harmonic warmth and some dynamic and upper frequency gentle moulding
  2. Oeksound Soothe 2 – a dynamic EQ, for lack of a better description, that looks for resonances. In this case Soothe 2 has been used to reduce resonances that plague the type of playback devices that podcast listeners will typically use, ie laptop speakers and earbuds.
  3. Slate Digital VBC FG-Grey – this compressor is one of my favourite mix bus compressors and in this case has then been used to glue the whole mix. The setting used are a slow attack and quick release with a gentle ratio for minimal gain reduction.
  4. Fab Filter Pro-L has finally been used to bring the level up to the desired professionally competitive level. Generally it is held that podcasts only require an RMS of between -16 to -12dB. So this was the level aimed for.

I hope you enjoy the In The Making series, I know I’m enjoying the content as I polish it.

For more tips on podcast production, there is a good introductory article by Izotope that I would recommend reading entitled 10 tips for a great sounding podcast.

Recording the NHSPA Choir

This week I had the pleasure of recording the Newtown High School of the Performing Arts Choir.

The recording was for the theme music for a forthcoming animation series by Mat McCosker and colleagues. The animation is currently in the second round of animation funding with Screen Australia has has a uniquely Australian look and story. Good luck Mat and co, I hope to see this animation up their next to the likes of other internationally successful animation series such as Bluey.

Back to the recording, the theme music was written by Elana Stone and the choir’s was conducted by  Tanya Sparke. These two women are great Australia vocalists in their own right, please check out their works on Spotify by following the links.

To achieve the desired standard choir sound, I used distant micing as typical of standard choir recordings. In particular I used a ORTF pair of Sennheiser MKH8040 small diaphragm condensers at 4-6 feet from the choir, coupled with a spaced pair of Neumann U87s slightly deeper in the room. To provide a sense of depth, reverb and greater distance, I used a Rodes NTR Active Ribbon microphone to capture the room reflections. This figure 8 microphone was placed at the furthest point from the choir, and was hidden behind a baffle in order to prevent any direct source from the choir. The null of the figure 8 was pointing towards the choir / baffle, the polar pattern of the mic therefore only picking up reflections of the choir. This was compressed to taste and used in the mix to add depth and a natural reverb / room tone.

The transient response for the small diaphragm condensers, ie the MKH8040s was excellent, and for a more detailed overview of the differences between small and large diaphragm condensers, see this below article by Neumann.

All mics were tracked directly into the SSL924 at SAE Sydney. The cleanliness of such pre amps was deemed appropriate for the desired tone colour of the recording.

Below are a few pictures from the session.

Binaural Field Recording

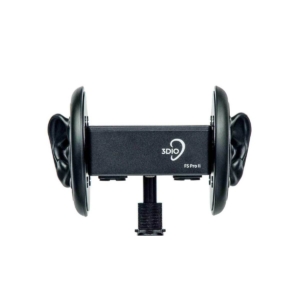
For those that don’t know, I have been a lecturer in the Audio department at SAE Sydney for the last 5 years. At the close of campus 2020, I was fortunate enough to be able to borrow some field recording gear, namely a Zoom F8 (multi-channel recorder) and a 3DIO binaural microphone. A big thanks to Akshay Kalawar and Mel Bertram for enabling me to access Brisbane’s 3DIO microphone, see the microphone type pictured below.

For those unfamiliar with binaural microphones, they replicate the human binaural (two ear) experience. The presence of two ears enables the microphones (placed in each ear) to capture aural cues such as ITD (interaural time differences) and ILD (interaural level differences). Simply put, the two ear microphone captures differences in arrival time of sounds positioned in space around the listener. For example, a sound to the right of the listener or microphone would arrive at the right ear/microphone before it arrives at the left ear/microphone. Such cues we call ITD (interaural time differences). Similarly, the microphone will pick up level differences between the two ears, for example, a sound to the left of the microphone will be louder in the left ear than in the right, hence capturing ILD (interaural level difference) cues.

There are also microphones such as the Neumann KU-100 that also emulates the shadowing effect of the head in the human aural experience, but will a price tag of 12K or thereabouts, I as yet haven’t had the fortune to use such as a mic. See the KU-100 pictured below.

The objective over the summer break was to capture some natural bush and ocean environments with the equipment on loan from SAE. I am grateful to be living these days on the South Coast and the natural soundscapes in my day-to-day life no only have a calming effect on my person, but an inspiration in my creative audio work. Elements of these recordings will inevitably find themselves woven into future electro-acoustic compositions that I will create.

Until then, I have minimally and cleaned up the recordings for public use and access. The recordings have been minimally edited to remove noises such as mic bumps and wind distortion. A touch of RX 7 Spectral De-Noise has also been used with a Reduction curve to focus on any low-frequency rumble from neighbouring highways and urban noise pollution in general.

If you would like to use these recordings, please do so as I have put them up on freesound.org with the Creative Commons license 0, ie you may use them commercially and do not need to credit me.

For those interested further in binaural recording, I have found on my journey both the written work and field recordings of Gordon Hempton to be highly inspirational. You can listen to his work at his website soundtracker.com, and to hear more about his efforts to preserve silent spaces, spaces devoid of any industrial noise, I’d very much advise listening to a great podcast, One Being, where Gordon is interviewed by the wonderful Krista Tippet.


Ars Electronica (Austria)

Late 2019 / early 2020 I collaborated with Grace Kingston & Josh Harle (Tactical Space Lab), creating sound designed / composed sonic elements for their project, On Eco-Sensualities with Untethered VR.

I’m happy to hear that the project is currently exhibited at the prestigious Ars Electronica, the Austrian museum dubbed “Museum of the Future”

Due to COVID-19, the work is mostly only accessible on line at https://ars.electronica.art/keplersgardens/en/eco-sensuality/

The project involves live mapping of the VR users environment, accompanied with triggered audio that increases and decreases based on the user’s interaction with their environment. Grace and Josh demo the work in Centennial Park earlier this year.

Below are some images from the project, courtesy of Grace Kingston’s website, that give an understanding of the immersive, arguably trippy experience.

Great work Josh and Grace.